In the dynamic world of electronics, bringing an idea from concept to reality often starts with a clear, concise drawing. That's where Designing & Drawing Circuit Diagrams comes into play. Whether you're a hobbyist prototyping a new gadget, a student tackling a school project, or a professional engineer refining a complex system, the ability to effectively visualize an electrical circuit is paramount.
Gone are the days when specialized, expensive software was your only option. Today, a new generation of free, intuitive online tools is making circuit diagram design accessible to everyone. This guide will walk you through the essentials, demystifying the process and empowering you to create professional-grade circuit diagrams with ease using platforms like Canva and Edraw.AI.
At a Glance: What You'll Learn
- What a circuit diagram is, its purpose, and its essential components.
- The difference between pictorial and schematic diagrams.
- How to "read" a circuit diagram like a pro.
- Step-by-step instructions for designing and drawing circuits using Canva's online tools.
- An overview of Edraw.AI's robust features for advanced diagramming.
- Best practices for creating clear, effective, and standardized diagrams.
- Tips for collaboration and sharing your designs with others.
The Blueprint of Innovation: Why Circuit Diagrams Matter
Every electronic device, from your smartphone to a complex industrial machine, relies on meticulously designed electrical circuits. A circuit diagram is essentially the blueprint for these systems—a universal language that engineers, technicians, and even enthusiasts use to communicate ideas, troubleshoot problems, and build functional electronics.
Imagine trying to assemble a piece of IKEA furniture without the instructions; now imagine doing that with tiny wires and sensitive components. That's the challenge circuit diagrams solve. They provide a standardized visual representation, making it clear how power flows, where components are placed, and how they interact. For a deeper dive into their fundamental role and historical context, learn about circuit diagrams and their underlying principles.
Decoding the Language: Elements of a Circuit Diagram
Before you start drawing, it's crucial to understand the basic anatomy of a circuit diagram. These aren't just random lines and squiggles; each symbol carries specific meaning.
Pictorial vs. Schematic: Two Ways to Visualize
You'll generally encounter two types of circuit diagrams:
- Pictorial Diagrams: These use realistic images or simple drawings of components. They're great for beginners or showing the physical layout, but less practical for complex circuits.
- Schematic Diagrams: These are the industry standard. They use abstract, standardized symbols for each component and focus on the electrical connections rather than physical appearance. This is what you'll primarily be creating with online tools.
The Essential Building Blocks
Every circuit diagram, regardless of complexity, is composed of a few core elements:
- Components: These are the individual parts that perform specific functions. Think resistors, capacitors, transistors, diodes, switches, and integrated circuits. Each has a unique, universally recognized symbol.
- Connections (Wires): Represented by lines, these show how components are electrically connected. In schematic diagrams, lines crossing usually mean no connection unless a dot is present at the intersection, indicating a junction.
- Power Sources: Batteries, DC power supplies, AC sources—these symbols indicate where the circuit gets its energy.
- Ground Symbol: This identifies the reference point (0V) in a circuit, a crucial element for stability and safety.
- Labels and Values: Numbers, letters, or short descriptions accompanying components to specify their type (e.g., R1 for Resistor 1), value (e.g., 10kΩ for a 10-kiloohm resistor), or function.
How to "Read" a Circuit Diagram
Understanding a circuit diagram is like reading a map:
- Familiarize Yourself with Symbols: Start by knowing the common symbols. Most online tools will provide a legend or hover-over descriptions.
- Identify Components: Go through the diagram and identify each component and its role within the overall circuit.
- Locate Power & Ground: These are your starting and ending points for tracing current flow.
- Follow the Current: Trace the lines to understand the path of electrical current from the power source, through components, and back to ground.
- Check Labels & Documentation: Labels provide critical details. Refer to any accompanying notes or datasheets for specifications.
Embracing the Digital Age: Your Online Toolkit
The barrier to entry for circuit design has never been lower, thanks to powerful yet user-friendly online platforms. Canva and Edraw.AI stand out as excellent, often free, options for quickly designing and drafting electrical or electronic circuits. They empower you to create everything from simple open or closed circuits to more complex parallel and series configurations.
These tools offer:
- Accessibility: Design from any browser or device, anywhere with an internet connection.
- Intuitive Interfaces: Drag-and-drop functionality makes placing and connecting components a breeze.
- Vast Libraries: Access hundreds of industry-standard electrical symbols without having to draw them from scratch.
- Templates: Jumpstart your design with pre-built, customizable templates.
- Collaboration: Work with team members in real-time, sharing ideas and making revisions efficiently.
Let's dive into how you can put these platforms to use.
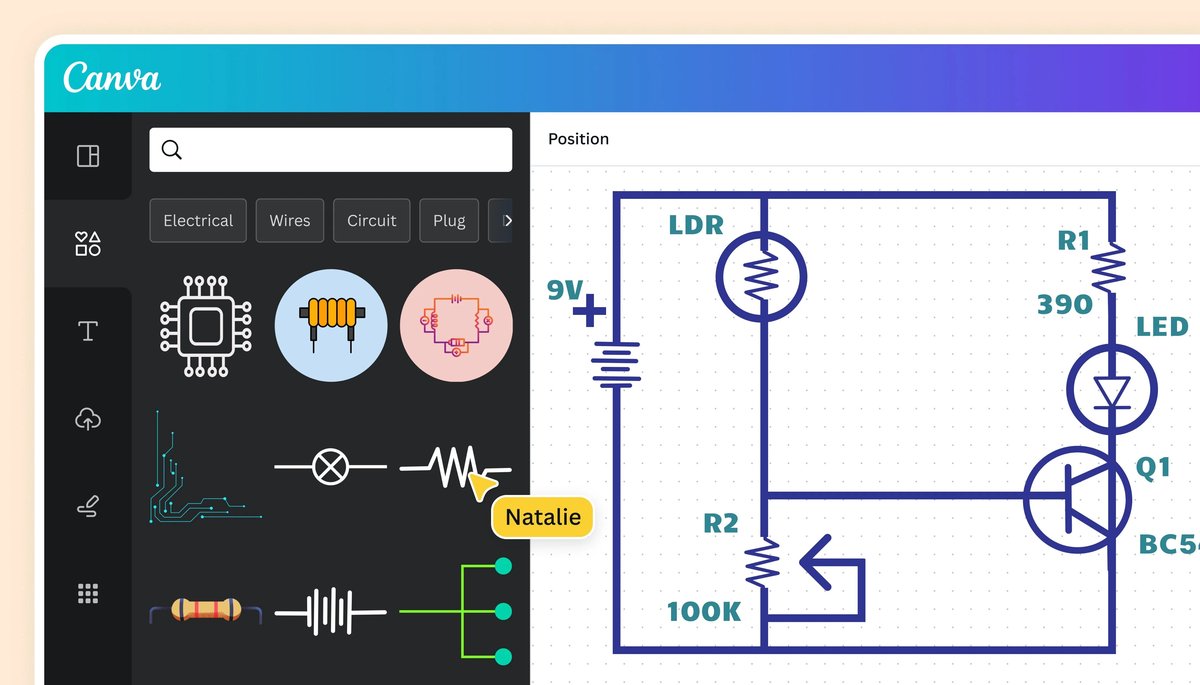
Tool Spotlight: Designing Circuits with Canva (Step-by-Step)
Canva, renowned for its graphic design prowess, also offers surprisingly robust features for Designing & Drawing Circuit Diagrams. Its whiteboard functionality provides an infinite canvas perfect for circuit design.
Step 1: Launch Canva and Choose Your Canvas
- Open Canva: Navigate to Canva on your web browser or open its desktop/mobile app.
- Search for "Circuit Diagram": In the search bar, type "Circuit diagram." This will bring up relevant templates and whiteboard options optimized for technical drawings. Select a whiteboard template to begin.
Step 2: Start Smart with a Template
Canva provides a range of customizable circuit diagram templates. These are excellent starting points, saving you significant time.
- Browse Templates: Scroll through the available templates. You might find one that closely resembles the type of circuit you're envisioning (e.g., a simple series circuit, a basic logic gate setup).
- Select and Customize: Click on a template to open it. Don't be afraid to heavily modify it. These are just foundations.
Step 3: Build Your Diagram: Components and Connections
This is where your circuit takes shape. Canva’s free media library is packed with useful icons and design elements.
- Add Components:
- Go to the "Elements" tab on the left sidebar.
- Type in the name of the component you need (e.g., "resistor," "switch," "battery," "LED," "transistor," "logic gate").
- Drag and drop the desired symbol onto your whiteboard.
- Manipulate Symbols: Once a symbol is on the canvas, you can click and drag to move it, resize it, duplicate it (Ctrl+D or Cmd+D), and even flip it horizontally or vertically if needed to fit your layout.
- Connect Them with Lines:
- Shortcut "L": The fastest way to add a line is to simply type "L" on your keyboard. A line will appear, ready for you to position.
- Automatic Connectors: Canva offers intuitive line connectors. Drag the endpoints of the lines to the connection points (or near them) on your components; they often snap into place, ensuring clean connections.
- Customize Lines: You can change the weight (thickness), color, and even the endpoints (e.g., arrows, circles) of your lines to denote different types of connections or current flow.
Step 4: Add Text and Labels
Clear labeling is critical for readability.
- Shortcut "T": Type "T" on your keyboard to instantly add a text box.
- Label Components: Add text to label each component (e.g., R1, VCC), specify values (e.g., 10kΩ, 5V), or provide brief functional descriptions.
- Organize with Grids: Canva's infinite workspace includes grids that intuitively snap elements into alignment, helping you keep your diagram neat and organized.
Step 5: Collaborate in Real-Time (If You're a Team Player)
Canva Whiteboards are designed for teamwork, making them ideal for school projects or professional design reviews.
- Share Your Design: Click the "Share" button in the top-right corner.
- Invite Collaborators: Invite team members by email or by sharing a link, granting them "can edit" access.
- Real-time Interaction: Collaborators can see each other's cursors, add sticky notes for quick feedback, and leave comments directly on the diagram. This significantly streamlines the review process.
Step 6: Share or Export Your Masterpiece
Once your circuit diagram is complete and reviewed, you'll want to share it.
- Export: Canva allows you to export your final diagram as a high-quality image file (PNG, JPG) or a PDF. This is perfect for reports, presentations, or printing.
- Share Options: You can also share directly to various platforms or get an embed code for websites.
Edraw.AI: An All-in-One Diagramming Powerhouse
While Canva excels with its intuitive design interface, Edraw.AI offers a more specialized and comprehensive solution for technical diagramming, including sophisticated circuit diagrams. Edraw.AI is part of the EdrawMax family, known for its extensive range of drawing types.
Key Features & Customization
- Extensive Template Library: Edraw.AI provides hundreds of ready-to-edit circuit diagram templates, specifically categorized for common circuit types like open, closed, parallel, and series circuits.
- Industry-Standard Symbols: Access hundreds of resizable, vector-based electrical symbols (resistors, switches, relays, capacitors, inductors, logic gates, etc.). Crucially, you can import and save additional symbols, making it highly adaptable to specific project needs.
- Intuitive Canvas: Similar to Canva, Edraw.AI offers an intuitive drag-and-drop canvas, making component placement and connection straightforward.
- Versatility: Edraw.AI is an all-in-one solution supporting over 210 drawing types, from mind maps and flowcharts to network diagrams and floor plans. This makes it a powerful tool if your needs extend beyond just circuit diagrams.
Collaboration & Workflow Efficiency
Edraw.AI prioritizes team collaboration and streamlined workflows:
- Real-time Co-editing: Team members can work on the same diagram simultaneously, reducing repetitive tasks and significantly improving project efficiency.
- Cloud Access & Multi-Device Support: Access and edit your circuit diagrams anytime, anywhere, from any device (desktop, web, mobile), thanks to its cloud-based architecture. This ensures everyone always works with the latest version.
- Enhanced Communication: By simplifying complex ideas into clear visual diagrams, Edraw.AI helps teams communicate more effectively, minimizing misunderstandings.
Access, Import & Export Capabilities
- Import Existing Diagrams: A significant advantage of Edraw.AI is its ability to import diagrams from other popular technical drawing software like Visio and CAD. This is invaluable for integrating existing work or collaborating across different platforms.
- Flexible Export: Export your final diagrams into a variety of high-quality formats, including PDF and various image files, ensuring compatibility with reports, presentations, and other documentation.
Cost-Effectiveness
Edraw.AI offers a free version that provides essential symbols, designing tools, and cloud storage, making it accessible for basic needs. For more complex designs and advanced features, flexible pricing plans and premium subscriptions are available, catering to individuals and teams with varying requirements.
Choosing Your Weapon: Canva vs. Edraw.AI
Both Canva and Edraw.AI are excellent choices for Designing & Drawing Circuit Diagrams, but they cater to slightly different needs:
| Feature | Canva (Whiteboards) | Edraw.AI (EdrawMax) |
|---|---|---|
| Primary Focus | General graphic design, creative projects, basic technical diagrams | Specialized technical diagramming, engineering, business |
| Ease of Use | Extremely intuitive, quick learning curve | Very intuitive, but with more specialized features to explore |
| Symbol Library | Extensive icon library, good for common symbols | Hundreds of industry-standard electrical symbols, import/save custom symbols |
| Templates | General circuit diagram templates | Specialized templates (open, closed, parallel, series) |
| Connectivity | Automatic line connectors, "L" shortcut | Smart connectors, often more specialized routing options |
| Collaboration | Real-time cursors, sticky notes, comments | Real-time co-editing, robust version control |
| Import/Export | Export as PDF/Image | Import Visio/CAD, export various formats |
| Versatility | Excellent for visual content, presentations | 210+ diagram types (flowcharts, mind maps, network) |
| Cost | Free tier, paid for premium features/stock assets | Free tier, flexible pricing for advanced features |
| When to Use Canva: |
- You're a student or hobbyist needing to quickly mock up a simple circuit for a project or presentation.
- You prioritize an extremely intuitive, drag-and-drop interface and basic functionality.
- You're already familiar with Canva and want to leverage its ecosystem.
- Your circuit diagrams are part of a larger presentation or graphic design project.
When to Use Edraw.AI: - You need to create complex, detailed, and industry-standard circuit diagrams.
- You require a vast library of specialized electrical symbols and the ability to add custom ones.
- You work with other technical diagrams (flowcharts, network diagrams) and want an all-in-one solution.
- You need robust import capabilities (e.g., from Visio or CAD) for existing projects.
- You're part of a team requiring advanced real-time collaboration and efficient workflows for technical designs.
Best Practices for Clear, Effective Circuit Diagrams
A poorly drawn circuit diagram can be more confusing than no diagram at all. Follow these best practices to ensure your designs are always clear, accurate, and easy to understand:
- Use Standardized Symbols: Always use universally recognized symbols. Both Canva and Edraw.AI provide these, so stick to them. Avoid creating your own unless absolutely necessary and clearly documented.
- Organize Logically: Arrange components in a logical flow, typically from left to right for signal or current flow. Keep lines clean, straight, and minimize crossings.
- Label Everything Clearly: Every component should have a unique identifier (e.g., R1, C2, U3) and its value (e.g., 10kΩ, 100nF). Add notes for critical functionalities or uncommon parts.
- Show Power and Ground: Clearly mark your power sources (e.g., VCC, +5V) and ground connections. This provides essential reference points.
- Use Consistent Spacing: Maintain consistent spacing between components and lines to prevent clutter and improve readability. The grid features in both tools are a great help here.
- Avoid Clutter: Don't overload your diagram with unnecessary information. If a section is complex, consider breaking it into sub-circuits or using block diagrams.
- Proofread and Review: Before finalizing, have someone else review your diagram. A fresh pair of eyes can spot errors or areas of confusion you might have missed.
- Document Your Work: Always accompany your circuit diagram with notes, explanations, or a bill of materials (BOM) for clarity, especially for complex designs.
Troubleshooting Common Pitfalls
Even with intuitive tools, you might encounter some common issues:
- Unclear Connections: Lines that look like they connect but don't have a junction dot, or lines that cross ambiguously. Solution: Use clear junction dots for connections and route lines to minimize crossings.
- Missing Labels: Components without identifiers or values. Solution: Double-check all components for proper labeling.
- Inconsistent Symbol Usage: Using different symbols for the same component type. Solution: Stick to the standardized library provided by your chosen tool.
- Overly Complex Layout: Too many components crammed into a small space, making it hard to follow. Solution: Utilize the infinite canvas, break down complex parts, or use multiple pages/whiteboards.
- Incorrect Power/Ground: Mislabeling or misconnecting power and ground can lead to confusion or even damaged circuits in real life. Solution: Verify all power and ground connections carefully.
Taking the Leap: Your Next Steps in Circuit Design
You now have a solid understanding of what it takes to start Designing & Drawing Circuit Diagrams using powerful and accessible online tools. The best way to learn is by doing!
- Start Simple: Begin by recreating simple circuits like a basic LED with a resistor, a series circuit, or a parallel circuit.
- Experiment with Templates: Explore the templates offered by Canva and Edraw.AI to see different circuit configurations and design approaches.
- Practice Reading: Find existing circuit diagrams online or in electronics books and try to interpret them using the principles you've learned.
- Build a Project: Apply your newfound skills to an actual project, however small. The satisfaction of seeing your drawn circuit come to life is immense.
With these tools and techniques at your disposal, the world of electronics design is more open and accessible than ever before. Go forth and create!